Friday 16 May 2014

Craft - easy sew Dorian the Tortoise

I had it in my head that I wanted to try a sewing project, an easy one to get me started. I was searching around and came across this exceptionally cute pattern and instructions for a toy turtle from Purl Bee. The tutorial is for a cushion-sized toy in a Liberty print. Unfortunately Liberty fabrics are a little pricey, although they are the best, so I used a bit of upholstery fabric for mine. Plus I decided I wanted mine to be a tortoise rather than a turtle.


What you'll need:

  • Fabric of your choice for the shell and soft parts (head, feet etc)
  • Felt for the underside
  • Sewing kit
  • Buttons for eyes
  • Stuffing
  • This template from Purl Bee - print it off at whatever size you want your tortoise and cut it out

Step 1. Cut your fabric from the template and work out what goes where.


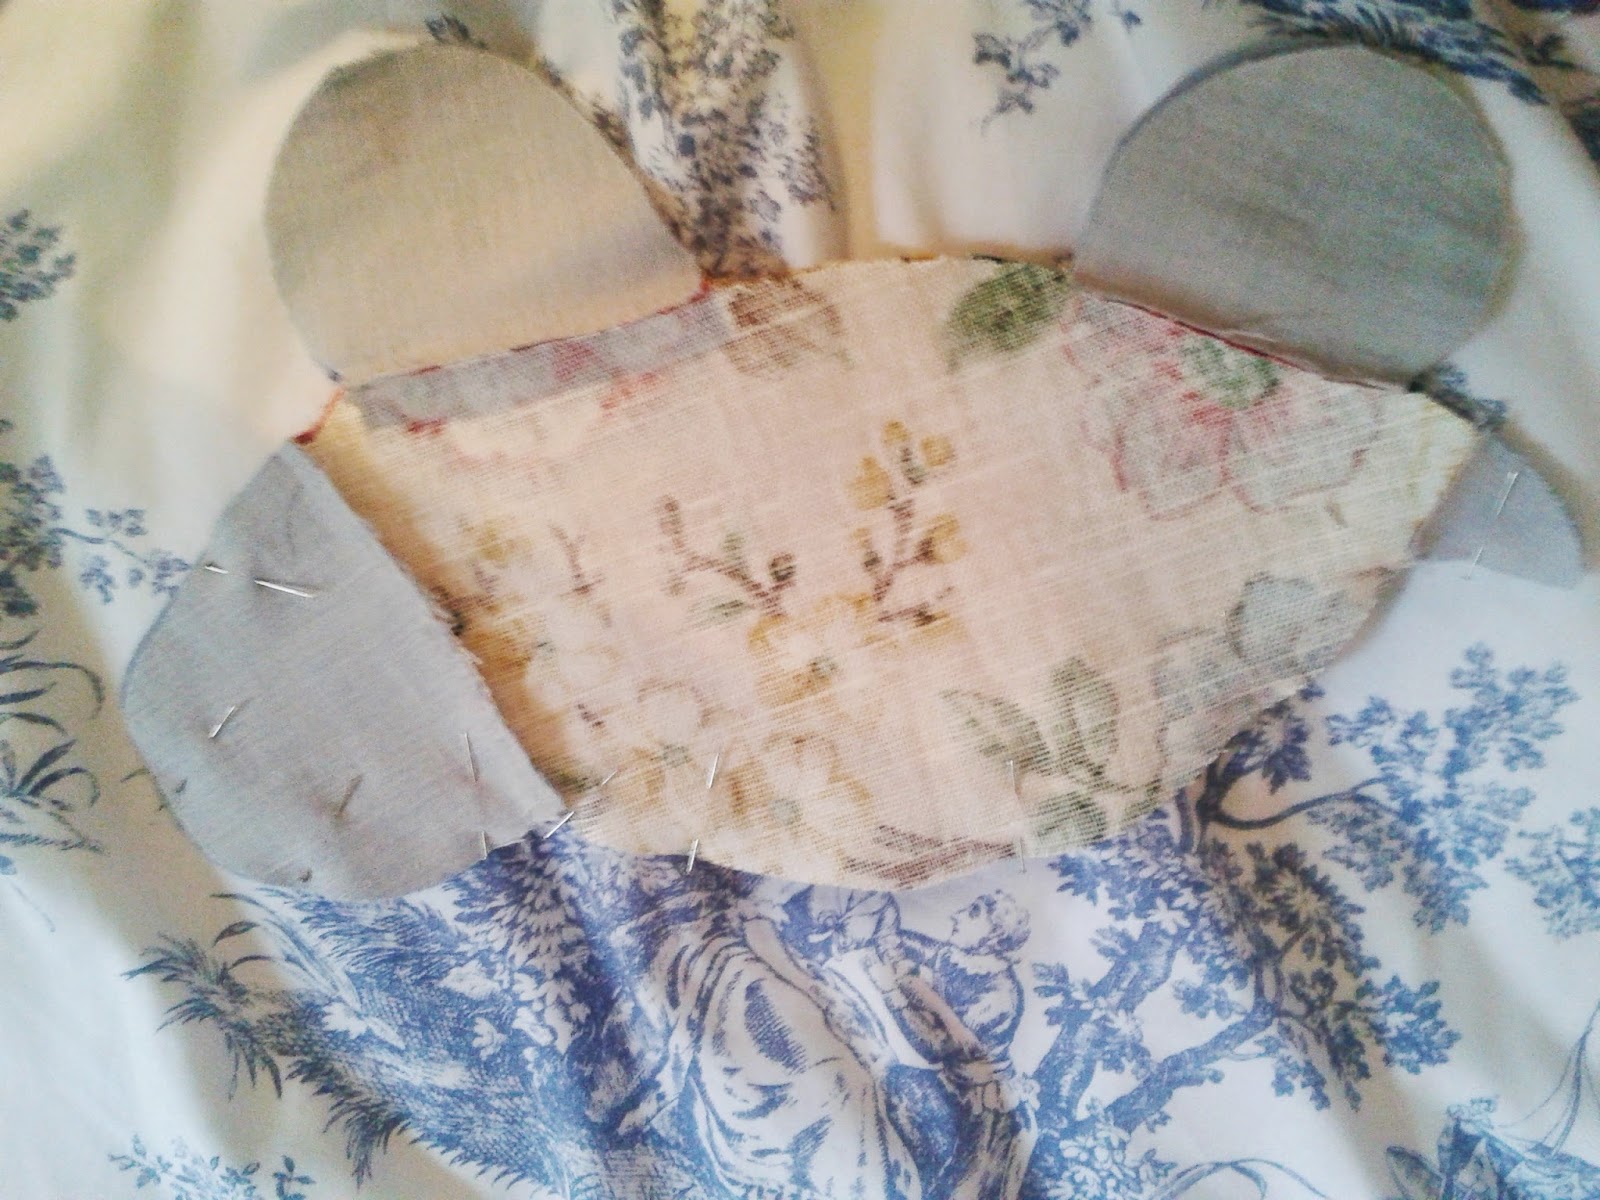
Step 2. Take one shell piece, the correct way up, and pin the feet, arms, tail and head on top of it, as shown:


Step 3. Sew in place. This would be so much easier if you had a sewing machine (which I don't), but I managed fine sewing by hand! Then fold out the blue pieces and iron the seams away inside the shell. You should then end up with a tortoise shaped piece.

Step 4. Repeat steps 2 and 3 for the other side of the tortoise. You should end up with two opposite-facing tortoise silhouettes. 


Step 5. With the correct sides together, pin your tortoise shapes together, leaving the underside open. Sew together.


Step 6. Open up your tortoise and place it (still inside out) onto your felt underside. Pin in place and stitch together, leaving a gap at the back. Turn the right way out.

Step 7. Fill with stuffing. You can buy toy stuffing in craft shops but I was impatient so just used bits of fabric, old socks etc. Alternatively, fill him up with rice and dried lavender for a heavier, sweet-smelling pillow.


Step 8. Stitch together the opening. Give him some eyes by sewing on some buttons.


Isn't he cute? He took me a couple of hours to make, but it'd be super speedy (ironically for a tortoise) if you used a sewing machine.

Tuesday 13 May 2014

Recipe - easy Tuscan biscotti / cantuccini

Yesterday I was trying to think of a dessert to make for a dinner party for 9. I wanted something I could make in advance because the oven was going to be full of casserole. Plus two courses and several glasses of wine in, cooking doesn't seem like such a good idea. So I scoured a few blogs and came across this recipe from Bread and Companatico (my FAVOURITE recipe blog).

I love biscotti and they're perfect at dessert because you can dip them in your dessert wine or your coffee. Also, they last for up to a month so you could make a big batch and bring a few out every time you have people over for dinner. They'd also be delicious with glazed baked pears or peaches.


Ingredients: 
500g plain flour
350g caster sugar
250g unpeeled almonds (I used ready-sliced because I couldn't find whole ones)
Grated rind of 1 lemon
1.5 tsp baking powder
4 eggs + 1 for brushing
30 ml milk (a splash)
Icing sugar to serve (optional)

Step 1: Preheat the oven to 180 degrees celsius. Combine your dry ingredients in a mixing bowl (flour, sugar, lemon rind, almonds, baking powder).


Step 2: Mix in your eggs and milk. You might have to stir for quite a while before the mixture starts to resemble a dough. Add a splash more milk if it won't stick together at all, but be patient, it'll get there.

Step 3: Split the dough in two and form a rectangular slab on two baking trays covered with greaseproof paper. Brush the rectangles with the extra egg mixed with a little water.

Step 4: Bake for c.25 minutes. Remove from the oven and turn it down to 140 degrees. Transfer the rectangles, baking paper and all, to a chopping board and cut horizontally into biscuit-shaped slices. If the mixture is still too runny to cut cleanly, put it back in for a few more minutes.

Step 5: Put back in the oven and bake for another 25-30 minutes, until the biscotti are turning golden brown and they stop looking soggy. Leave to cool, sprinkle with icing sugar and serve!


Biscotti means "twice-baked", which is what gives them their delicious crunchiness. However, remember that biscuits keep cooking after you take them out of the oven, so it's easy to overcook them. They will harden up as they cool down; ideally you should end up with biscotti which have a hard crunch on the outside and a slightly chewier inside.

Monday 5 May 2014

9 brilliant, cheap and easy crafts and gifts

I decided to do a round up of some of the amazing crafts and DIYs I've come across on Pinterest over the last few weeks. There's a real range of ideas here so hopefully there will be something for everyone! I definitely want to try these all out one day.


This looks really easy and you can customise the shape, size and colours to your taste. (Beauty and Bedlam)


These will brighten up any notice board! You could also make them with little magnets to go on the fridge. (Sarah Hearts)


So pretty and so simple. They'd be really lovely for Christmas in reds and greens as well. (The Benson Street)


Recycle an old jumper for cosy toes. (Most Interesting Things)


One of my own! But one of my favourites. (Anna Louise at Home)


A great and simple way to make personalised coasters (One Good Thing)


An amazing Ikea hack! (Ikea Hackers)


Really sweet idea for the garden - vintage tea cups can be found in pretty much every charity shop! (Modern Magazin)


This one might well be my favourite - I just need to get hold of a glue gun before I try it! (Whats Ur Home Story)

Hope you have fun trying these out for yourselves!

Sunday 4 May 2014

Craft - pressed flower ornament

This is a quick how-to for something which I've had for a really long time and have taken all over the place with me. It's really easy and also makes a really nice gift.


What you'll need:

  • Flowers - freshly picked and cut to the right size
  • Flower press (or heavy books and plain paper)
  • Photo frame - I used this one from Ikea (http://www.ikea.com/gb/en/catalog/products/00075689/) 
Step 1. Choose and pick your flowers. My sister and I picked these flowers on the day my grandfather died and decided to press them as a way of commemorating him (he was Welsh, so thus the daffodils!)


Step 2. Press your flowers. If you have a flower press, you just need to slip them in between the layers of sheets, tighten the screws and wait for about a week. If not, just put your flowers between two pieces of clean plain paper (ideally some sort of blotting paper) and place between the pages of a heavy book. The more you weight it down, the better it will work.

Step 3. Put them in your frame. I loved this frame from Ikea because it displays the flowers but also works as a paper weight and is completely free-standing. I wanted the blooms to reflect the heart shape of the frame, so I chose two flowers which looked symmetrical and arranged them accordingly.


Try not to keep your pressed flowers in direct sunlight as they'll start to fade, which would be a shame! Otherwise they can last for years, like mine have. Enjoy!